New Custom Rows! Edit, Order and Design Your Dynamic Content Blocks

Newsletters that are created by themselves? Campaigns-showcases with your e-commerce‘s new items that are composed in just a few clicks?
This is already a reality for many companies, but now they can count on new features that add a high level of control over the email while guaranteeing the same immediate and rapid creation.
Today we’d like to present the new MailUp Custom rows you can use to create emails and newsletters in just a few clicks, simply by:
- Recalling external content from a source
- Inserting it into the body of the message
- Refining the layout in detail.

From developing integrations to strategic support, from creating creative concepts to optimizing results.
Do you have an e-commerce site and want to send an email about the latest new items in your catalog? With custom rows, you can retrieve content from external platforms and insert it simply by dragging the content blocks into the message. No more copying and pasting or obsessive checking to verify the correctness of contents and links.
See the email below? With custom rows you can create it in just a few clicks, aligning the design with your brand identity.

Is the potential here still unclear? It might be useful to start from the beginning, using a practical example to help.
The new custom rows and content sources
There are essentially two new innovations to custom rows which let you:
- Customize the rows’ layout
- Add custom rows to the same emails which retrieve content from different sources.
This means that you can count on the immediacy of custom rows while maintaining a high level of control over the layout and richness of their contents.
But before understanding how custom rows work, you must clearly understand what content sources are. Here is a mini-summary (feel free to skip this part if you already know what we’re talking about):
Content sources are a MailUp system that makes it extremely easy to create automations for (automatically) sending emails and (automatically) retrieving content published on your site or blog. The sources are like desks that store your content and can be recalled in an email (and in automatic campaigns on Facebook Messenger and Telegram) through:
> RSS or ATOM feeds, in a recurring way according to a frequency set during the creation phase
> Files, uploading a .csv, .json or .zip file (max 5MB).
Where can I use the content that is stored in a source? One of the possibilities, and the one we’re going to discuss today, is to call up the source in order to insert its content with a custom rows.
Now that you understand sources, let’s take a look at how to set up an email with the new custom rows.
Let’s apply the custom rows to a Content Marketing strategy to create emails that communicate the latest articles of a blog (MailUp’s blog in this example).
How to create emails with custom rows
1. Create the template
The first step is to create an email template, or structure, which will populate with your blog’s latest publications from time to time.
You can use a template saved in the My Models section or create it from scratch. How? Enter BEE, the email editor integrated in MailUp, and choose one of the many templates with a default structure. What you need to create is:
- A header
A sort of cover image of the email which makes the email recognizable, week after week. - A footer
To communicate the details of the brand sending the email and offer the chance to unsubscribe or share on social networks.
Here is the template we are using as an example:

2. Insert the custom rows
Now that we have the skeleton, we can continue with the insertion of custom rows:
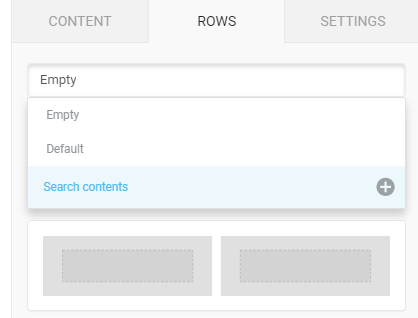
- Click on Rows in the menu on the right in BEE
- Click on the drop-down menu
- Click on Search contents, the new item in the list that lets you access the new custom rows commands.

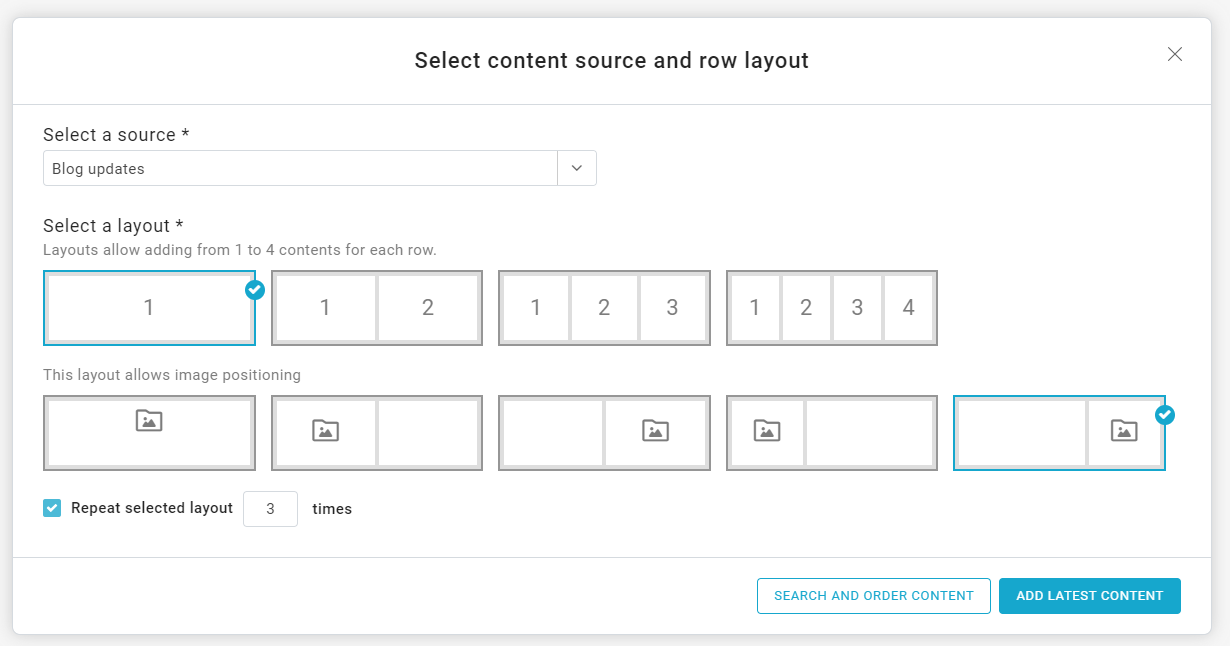
This screen will appear:

- Select the source with your content (in our case the blog articles)
- Select the layout, choosing between rows which are stacked one on top of the other, side by side, or arranged in rows of three and four (we chose the first option in our example)
- Select the image’s position (top, right, left, etc.)

- Choose whether to repeat the selected layout and the number of repetitions (in our example we repeat the layout three times, imagining we’ll have three weekly news items to communicate)
Once the rows have been fine-tuned, you have two choices:
- Add latest content
To automatically retrieve the latest content in chronological order that has been uploaded to the source - Search and order content
This is an important innovation, because it lets you manually choose which content to insert and the order to place it in. We chose the latter method for our example, because we want to insert the Christmas post in the first place; even though it was not the most recently published article, it is the most relevant for our audience.

After having chosen the content blocks, you’ll find them in the menu on the right.

Now just drag the rows into the body of the email. Here is what the email looks like with the previously-chosen settings:

3. Refine layout and content in detail
Is there anything that doesn’t convince you in the newly created layout? You can intervene to refine each element:
- Images
You can upload new photos to accompany the contents. In our case, the second post’s image has slightly different dimensions than the others. We will see to providing the correct format - Text
We are not in love with the italics in the titles, moreover we always use Open Sans in our emails. Additionally, the descriptions of the posts are too long, forcing the call to action to not be in line with the image. - Call to action
Blue is not enough to catch the recipient’s attention: a brighter tone is better, and one that doesn’t appear anywhere else in the email and really makes the button stand out. - Padding
The email doesn’t have room to breathe; we want to give the whole thing a bit more airiness: we will increase the padding between the rows.
Here is the result of the tweaks:

4. Add content from another source to the email
Another important feature of the custom rows is the ability to add custom rows to the same email that draw from different content sources.
It is easier to understand the potential of this aspect by continuing with our example.
We want to add content concerning the guests of MailUp Marketing Conference to the email we just created.
In short, this feature makes it possible to cross-reference sources and create emails with different levels of content in just a few clicks.
Let’s see how it’s done:
- Click on Rows
- Click on the drop-down menu
- Select Search contents and set the type of form you want to insert (same operation as before)
- Enter the content you want to select.
And here’s the result:

Wrap Up
Custom rows can be adapted to the most diverse objectives, and not just Content Marketing (as in our example): an e-commerce site can quickly populate a mobile-responsive DEM, recalling prices, images, links to product pages, or deciding to only include the items it wants to promote.
Or brands can use custom rows to quickly segment emails. How? By filtering the special offers for the shops in Milan, Turin, or Rome directly in the platform.
Custom rows let marketers invest more time and energy where they are needed, as MailUp’s custom rows will see to creating emails quickly and intuitively.
Haven’t tried our platform yet? Request a free trial of the platform today.
