Segmentation + Personalisation + Automation: you can do everything with the Filters

Our launch post promised you new filters and we are now ready to go, initiating a cycle of publications dedicated to segmentation and email personalisation tools.
Today’s post is an overview of everything a company can do with the advanced filters. As you will discover, our objective is to show you how segmentation, personalisation and automation activities may be linked to each other.
A mixture of functions which unleashes the full potential of Email Marketing because, as we are always saying, the future is in one to one relationships with customers.

From developing integrations to strategic support, from creating creative concepts to optimizing results.
You can do everything with the new filters
Advanced Filters allow you to link different conditions together and define target recipients with maximum precision. This results in an ever-increasing potential for engagement and conversion of emails.
To summarise the innovations, with the new Filters you can:
- Create a filter by linking up to 20 different conditions
- Create subsets and condition hierarchies
- Obtain a preview of the segment created
- Share the filter with all the lists
- Create a copy of the filter.
However, as we will see, filters play a fundamental role in other Email & SMS Marketing activities, as they assist in personalisation and automation operations as well as in segmentation.
Let’s look at the possible uses of the Filters, point by point.
1. Performing advanced searches and identifying new target segments
Let’s start with the simplest, though not the least important: searching for a segment within the database.
Searching with a filter will allow you to check your database’s composition: in other words, you have an extra ally to guide your campaigns according to your business. Filters allow you to understand which, and how many, targets you can direct your brand at, thus saying farewell to mass mailings and creating a set of diversified campaigns on the basis of the characteristics, interests and specifics of your database.
In this way, thanks to the filters, you can perform searches to find various targets to whom similar Email or SMS campaigns may correspond.
2. Launching segmented campaigns in detail
Now we are getting to the heart of the matter. You’ve designed the campaign, you’ve created it, all you have to do is send it. The filters allow you to find the right target in just a few clicks.
The new MailUp filters are so advanced that, within a database of, let’s say, 100,000 contacts, you can search for and identify even the smallest niche of recipients in line with the campaign.
The more limited the segment identified, the greater will be the campaign’s performance as it will definitely be relevant to those recipients. What advantage would there be in sending it to all 100,000 contacts in the database? None, in fact there are probably somewhat contraindications, such as a higher rate of unsubscription.
Let’s take an example of segmentation with filters. In this hypothetical campaign we have selected two:
- 1 activity filter: First send
- 1 personal data filter: women

Within a database of almost 50,000 contacts, the filter detected a sample of 13 contacts in line with the preset conditions. This is an extreme case but it illustrates the filters’ potential; how they allow identification of the target for each campaign.
3. Converting a combination of filters into a Group
After the target has been identified, the brand will very probably want to send further campaigns to that same segment in the following months.
In other words, that segment becomes a consolidated rather than an improvised target for the company, to be nurtured over time.
In this way filters can help to create a new Group. To create this group, you go to Recipients >Groups and click on the NEW GROUP button in the upper right corner.
After choosing the name of the Group, you click the Actions button and select the View email or View SMS function: you can now access the searches of the recipients with the filters.
4. Exporting the Group of recipients
Anyone who works in Email Marketing has found themselves, or at some time or another will find themselves, exporting contacts in the form of an Excel or csv file.
To do this you go to the Recipients >Export page. At the top of the page, you make sure you select the Export label and you choose how to segment the recipients for a targeted export: we will do it by group membership. Finally, you choose the format of the export file and click the Export button. So simple.
Once the export is finished, you click on the top Export list section. You now click the Actions button and then Download. You can open the file or save it to your computer.
5. Automating the personalisation of emails
We have now reached one of the most advanced uses of filters. This is aimed at personalising emails by applying rules for displaying lines and entire sections of the message. These will be automatically filled in with the most suitable content for each recipient.
To do this, tou use the Display conditions function as well as the filters. This allows you to apply a filter for one (or more) blocks of the email when creating the message. Basically, Display conditions allows you to deliver emails to recipients which contain images and texts in line with their characteristics, preferences and needs.
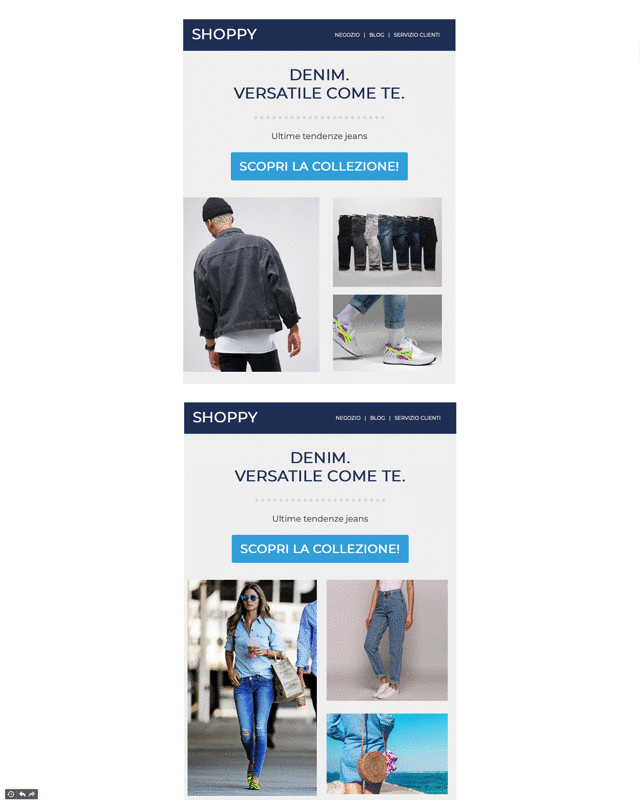
The following is an example of an email in which Display conditions has been applied to show products for women or men according to the recipient.

Differentiation is possible thanks to the Filters, which will be applied to the content module.
6. Setting up an automatic mail
Filters are also essential for activating a triggered message, be it an Email or an SMS.
By combining Filters and Marketing Automation functions you can, for example, activate automatic mail to customers who have made a purchase in the last 30 days.
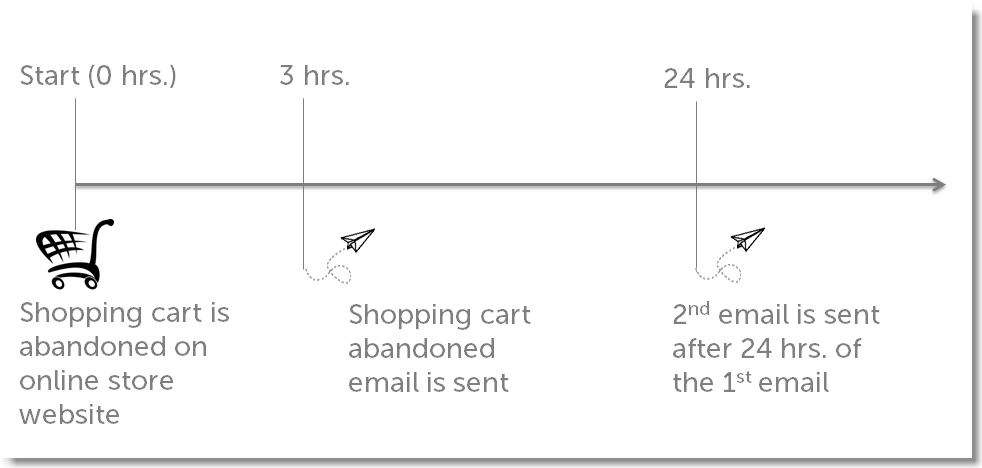
Alternatively, a common scenario in e-commerce, you can send abandoned basket recovery emails. We will use a personal data filter and an activity filter to create this automatic function. The following is an example of a possible flow:

As we said, to create it you need to apply a personal data filter which searches for all recipients who abandoned their basket three hours ago.
Another filter will be needed for the reminder, this time an activity filter, to segment the recipients who received the first email and opened it exactly 24 hours ago.
7. Setting up an automatic campaign
Last, but not least, the use of filters to create an automatic campaign.
What do we mean? We mean emails and newsletters which are automatically composed, by taking external content from a source and inserting it into the body of the message.
This type of campaign is based on two elements:
- The sources: these are like chests storing your contents. You can install these in the email via RSS or ATOM Feed or via a File, by uploading a .csv, .json or .zip file (max 5MB)
- Content modules: those elements which, when inserted into the body of the message, will be automatically filled in with the content stored in the source.
Filters are also essential for this type of campaign because they allow you to segment your audience by selecting different target recipients. An E-commerce campaign can, for example, create two different automatic campaigns:
- An automatic campaign for men, so as to only automatically forward the latest new items in the men’s catalogue to male contacts
- An automatic campaign for women, so as to only automatically forward the latest new items in the women’s catalogue to female contacts.
However,there are lots of possibilities.
To sum up
We wanted, with this article, to show you just how linked and interdependent segmentation, personalisation and automation activities are and how indispensable filters are in these activities.
Our desire is to make more and more companies take a one to one approach with customers and prospects, and to make advanced use of Email Marketing technologies which, as you must have noted, are available to everyone.
Finally, if you haven’t already tried MailUp, we invite you to request a free trial of the platform. You will have 30 days to try all the features and tools seen so far. See you soon!
